Preface
These tools have changed as of Inventor 2013; any version of Inventor 2012 or prior will not have the same toolset available.
Introduction
Within the Autodesk® Inventor® software, Materials and appearances allow for a multitude of benefits, from calculating accurate mass, bill of material propagation, to enhanced title block usage. Setting up and defining new materials and appearances, while slightly complicated, is typically a one-time operation and will be available for years to come.
Library Definition
Material and Appearance libraries are stored as .ADSKLIB Files and can be stored anywhere on the local or network. One Library in particular, the Autodesk Material library, is a read only library that not only Inventor, but also AutoCAD, 3DS Max Design, Revit, and other software can access to add materials to their respective scenes and models. In visualization software, such as 3DS Max design, the term ‘Material’ is used to describe the visualization of an object, whereas within Inventor, we know this as ‘Appearance’. With that in mind, the ‘Material’ Inventor and other engineering software use, refers to the physical, mechanical, and thermal properties of a given material.
Currently loaded libraries can be found within the project dialog, inside the Material library and Appearance Library sections:
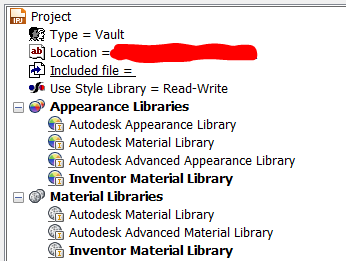
Additionally, if the mouse is placed over the library, the path to said library will appear. Lastly, if Appearance Libraries or Material Libraries is Right-clicked, options to add additional libraries become available.
Accessing the Material Browser
To gain access to the Material browser, start a new 3D part or assembly model; then, in the quick access toolbar, click ![]() to access the Material Browser, or click
to access the Material Browser, or click ![]() to access the Appearance Browser.
to access the Appearance Browser.
The Material Browser Interface
Within the Material Browser, there are essentially 2 areas to look at; the above section, which houses copies of library materials in the current document, and the below section that allows users to navigate through various libraries and copy materials from said libraries to the document:
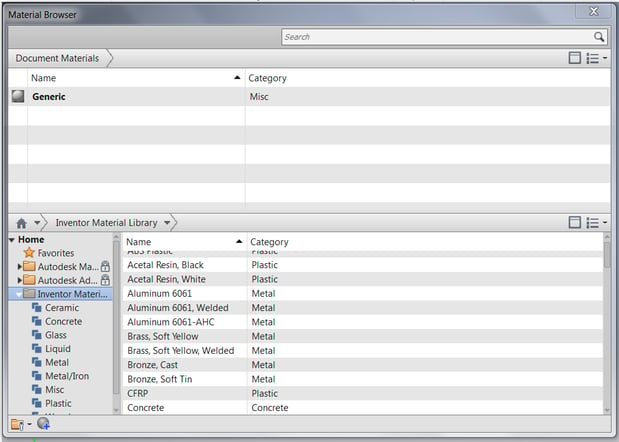
Note that the Autodesk Material and Advanced Material Libraries are not editable, but can be copied into any editable library.
To add a material to the document materials, either drag and drop or click the icon at the right end of the rows, both of which will copy it to the above section and make it editable.
![]()
To edit a material double click on it or right click and choose edit. When editing a Material, the user will be presented with a new dialog with tabs breaking down the Identity (which includes descriptions, manufacturer, searchable data, and type), Appearance (which defines which appearance to use when this Material is applied to a 3D model), and Physical (which contains the basic thermal, mechanical, density, and strength definition).
Users can also duplicate materials and change them as needed within the document materials list. This is especially handy for creating new materials that are very similar to existing ones. NOTE however, that duplicating a material will duplicate the Appearance with it. If the intent is to have several materials that use the same Appearance, duplicate the material, then edit it to bring up the editor dialog. Once there, switch to the appearance tab, where the duplicated appearance will be displayed. On the appearance tab name there will be an ![]() icon, select it and then browse to the original appearance within the library.
icon, select it and then browse to the original appearance within the library.
Using Http://www.Matweb.com , which is an excellent website full of useful information regarding different alloys of metals, polymer strength data, as well as images that can help in the creation of appearances; I was able to find some information about 304 Stainless Steel:
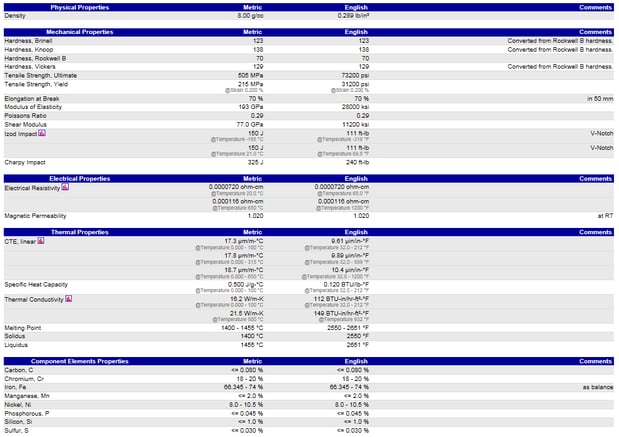
http://www.matweb.com/search/DataSheet.aspx?MatGUID=abc4415b0f8b490387e3c922237098da&ckck=1
From this information, a new material was very easily made, I took the existing Stainless Steel from the Inventor Material Library, copied it into my document materials, then duplicated it and renamed the copy as ‘304SS’ I updated the Description, then re-linked the appearance back to the original Semi-Polished colorization. I also went to the Physical tab and update the density, as well as the thermal and mechanical properties, in the event that I want to use this part within my Inventor Professional FEA or Nastran environment.
Creating New Libraries
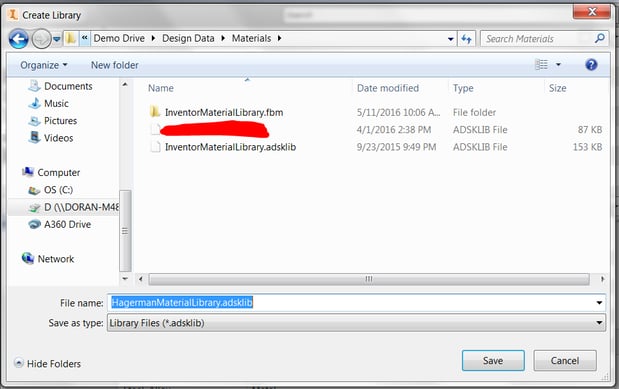
Whist the Material Browser is open, the icons in the bottom left corner allow users to create new materials from scratch or to manage the active libraries. In this case, to create a new library, click the ![]() Icon and choose Create New Library from the list. I would recommend that this newly created adsklib file be saved within the company standard Design Data directory for ease of access.
Icon and choose Create New Library from the list. I would recommend that this newly created adsklib file be saved within the company standard Design Data directory for ease of access.
Once the new material library is created, it will be added to the lower portions left hand side. Within this Library new categories can be created to organize Materials, such as glass, paint, wood, metal, etc.
Once a new library has been created, users can copy appearances from the document or from other libraries into it for safe keeping and later use. In my case, I added my 304SS material which added the Semi-Polished Appearance to my HagermanMaterialLibrary. From here I could continue making additional materials and appearances within the library.
A More Practical Use for Appearances…
For a long time, I have seen users create a separate, custom property for ‘Finish’, but technically the finish property is already in Inventor…
I simply duplicated the Semi-Polished in my document materials, then renamed it Black Oxidized, from there I checked the box for Tint, then changed the tint value to a color about 128,128,128 (RGB).
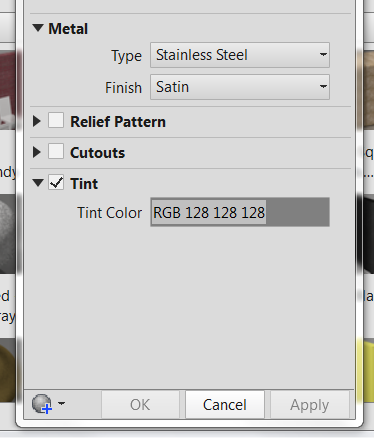
Once that was complete, I added it back to the HagermanMaterialLibrary. I could repeat this for all of the different finishes that I would need for my parts, additionally, I could change the name for Semi-Polished to something like ‘no-finish’ to make sure it displays properly in the next step.
Once the materials and appearances are defined, I created a model and applied my 304SS material and in turn the part appearance changed to ‘no Finish’ I selected the second pull down for the appearance and selected my Black oxidized and the part turned nearly black. I then saved the part and threw it onto a drawing. Anywhere that I want to see the ‘Finish’ I would just place a piece of text, then pull the Properties-Model > Appearance value.
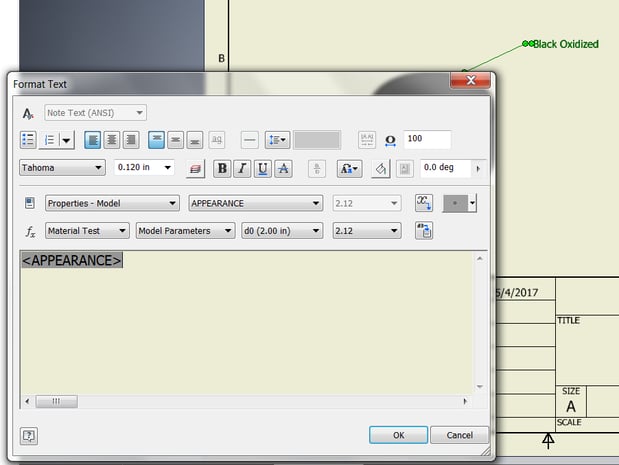
Do note, that if this was needed in a Title Block the same effect could be accomplished by editing the title block and adding the value driven text.
Project set up
Lastly, if this is a library that is intended to be used over and over again, it would be recommended to add it to the IPJ file so that new materials can be easily found. To do this, access the projects dialog and make sure that no files are open so changes can be made to the IPJ file. Right click on each the materials and appearances libraries and add the library. Once this is done, save the changes to the IPJ file.
Conclusion
While the process for creating a company specific material and appearance library may be a bit time consuming the end results from it are very powerful; being able to accurately measure the weights of designs, display them in a more accurate representation, and being able to pull appearance data as finish just to name a few.


Comments