A brief “basics” introduction…
While this may not seem like it would affect CAD software at this point, bear with me. There is a CAD related point to all of this, but we must cover some basics first. As a function of the average p.c. system, a system temp folder is used to store files for fast retrieval and processing. The system temp folder is used by nearly every piece of software out there today for this workflow….as well as for other reasons. This folder is used in this manner instead of cramming all that data into system memory (RAM) which would immediately negatively affect system performance and stability. Utilizing the system temp folder, however, does not have an immediate impact on the system performance…….. or does it?
|
|

As the system temp folder is used, files are written to this directory for fast access. Once the system is done using the files, they are left there to hang out and wait for possible future use, which rarely happens. This causes the system temp folder to fill up with hundreds or even not thousands of files that are not needed daily. As a directory fills up with files (this applies to any directory), it takes the system longer to search for the necessary file and process it. Herein lies one of the most common reasons that software won’t install at all, or web pages load slowly or that software is unresponsive…… they’re all reading through a directory of thousands of files, trying to find that one file it needs…… it’s a needle in a haystack my friends.
How does CAD software interact with %Temp%?
Enter CAD software into this mix and the system temp folder is used even more heavily. Of all the data out there Design Software files are some of the largest file sizes across all industries and applications (not including databases). Each CAD package will interact with the system temp folder in some fashion and most of the time the CAD packages do *NOT* clean up after themselves…..like thoughtless teenagers, they expect someone else to do it for them. Autodesk software is no exception to this behavior. So it’s a good idea to routinely clean out your system temp folder. A quick and simple solution is to use the Windows Task Scheduler and a batch file.
Steps to clear out the System Temp folder:
These steps are provided for example purposes only and you should consult with your company IT department for assistance/guidance in creating a batch file and a Windows task that is suited for your environment and system settings. Depending on system speed and the size of the system temp folder, deleting all of those files can take some time so it’s best to create a Windows scheduled task to run after hours…..say early on a Sunday morning. Step 1 is to get a batch file created that will perform the actual work of cleaning house for you. Below is an example of a simple batch file script that can accomplish the task.
CD C:\Users\<username>\AppData\Local\Temp
del %TEMP%\*.* /f /s /q
The actual command portion “del %TEMP%\*.*” is the bear minimum requirement for this to work at all but the switches “/f /s /q” are needed to make this an “unmanned” operation. The “/f” switch forces the deletion of Read Only files. The “/s” switch deletes specified files from the directory such as “system” files and will display those in a list during deletion, but this switch is optional. The “/q” switch enables the Quiet Mode operation so that it will not prompt you for a delete confirmation of each and every file/folder within the system temp folder. Create your script using any ASCII editor, such as Notepad.exe and save it with an extension of .bat or .cmd. into your main C:\ drive root folder.
This entire process depends on various things being set and controlled properly……such as the mapping to your system temp folder. The Windows default is presented in the example batch text above (C:\Users\<username>\AppData\Local\Temp). That path can be changed or remapped but the %temp% syntax should always navigate to that folder, regardless of the location. Again, coordinate this with your local IT department.
Once the batch script is created, a Windows Scheduled Task must be used to automate this process. As stated before, work with your local IT department to set this up with the appropriate permissions. Having this automated might also reduce any headaches for your IT department regarding system maintenance. It’s a win/win for all. For instructions on how to create a Windows scheduled task (you will need local Windows Admin rights) see this Microsoft article.
System Maintenance Examples
I have provided examples of my own temp folder as well as my Windows Schedule Task list. In addition to the standard tasks and my Delete Temp task….. I have also created a task to automatically reboot my system weekly in order to refresh system RAM and other system resources so that all of my software, not just CAD, will perform faster and function with more stability. While this setup is not guaranteed to fix system performance or stability issues, it most certainly cannot hurt to help keep a cleaner system temp folder to aid in system stability and performance. As designers, we sometimes are overloaded to the point that system maintenance becomes a daydream and this setup will help automate some of the needed maintenance to help benefit you during your workday.
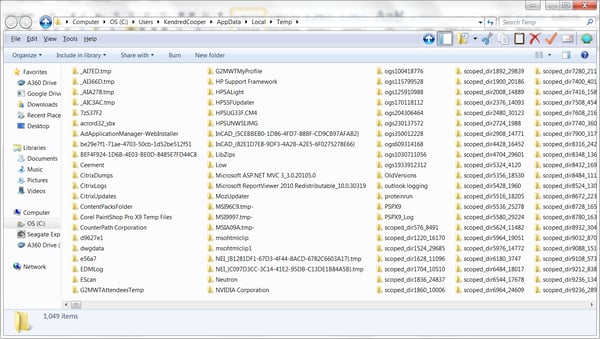
System Temp
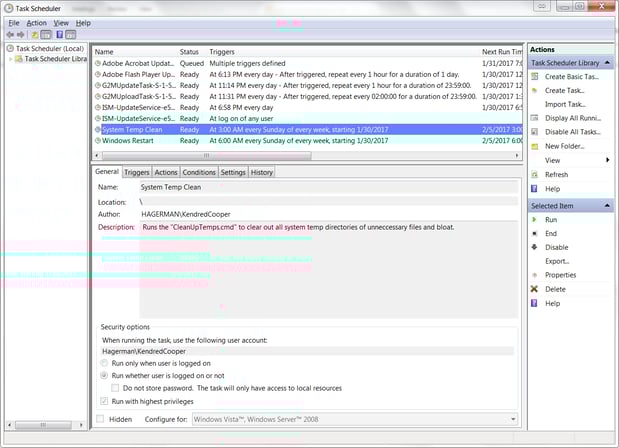
Windows Scheduled Tasks


Comments