One common question I receive when on site with customers configuring data management or teaching class is “How should I set up my Design Data?” While there are a lot of good answers to this question, I thought I would highlight a few solutions and some scenario’s in which they work well, as well as some scenarios in which they don’t.
First, let’s take a look at where these settings are defined.
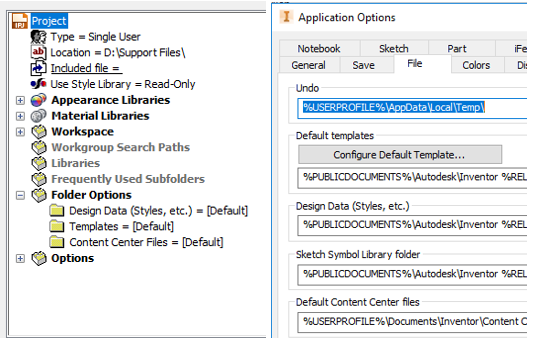
The Design Data configuration is controlled in two places, within the application options> Files tab, and within the project itself, nestled within the folder options location, typically marked as default. With Default used within the project, the Application options path will be the location to look for. This gives us some abilities here. If a user wants to overwrite the settings within a project, they can simply edit the default path to go somewhere else.

Some things to note about the default location; first, it is aimed at a local C: Drive location, which of course doesn’t lend itself to sharing this content. Second, each of these paths are looking at the 20XX version in which was installed. While this isn’t the end of the world to keep the data in each version, care needs to be taken to migrate these files and put them in the correct location each upgrade.
Changing the settings in Application options
While it is possible to change the settings within Application Options to force the “default” location of the computer to go to an alternate location for Design Data, Templates, and Content Center files, I typically don’t recommend this, here’s why; it can cause problems with the base installation of inventor…
If, for example, I am on a laptop and I have my Application Options set to network drive letter, any time that I do not have access to that drive letter, my new dialog and opening of files is going to have poor behavior.
Setting up a project for network Template and Design Data usage
Instead of defining the network location within the application options, let’s look at defining them within the inventor project. Access the inventor project by going to the get started tab and then the projects tool. With the correct project active, in the lower portion of the dialog, expand “Folder Options” and then right click on each of the Templates and Design Data and Content Center Files, and browse them to a network location. Once complete, save the file. This will ensure that the Project will ignore the default location as specified and use the Network location instead.
When setting up a network location for these directories, I typically will take out any year or edition monikers from the path. That way, when I move from version to version the settings will still be the same, and all I need to keep focus on is getting them migrated for the next release. NOTE, this would require all the users to move to the new version simultaneously…
Laptops, Again…
While this does update the system or systems to look at a singular location, and it does ensure that if the project is visible, the folder locations would also be visible (assuming the IPJ is also on the same network location). But again, if the laptops leave the in-house network, and have no access to the servers, the entire project and its folder options would be MIA.
Pseudo-Centralized Folder Options
So, how do we get to a point where all users, towers and laptops combined, can work on files and have the same configured Design Data? By putting them in two places…
I have done this a couple of times in the past; first, I places all the content on a network location, then, I created a batch file that copies (more specifically RoboCopy) the contents of the network Inventor support directories into local Inventor support directories. Next, I use the task scheduler to run the batch file daily. Lastly, I aim the application options to the local, and the project to the network.
This can be done however, if care is taken to keep localized copies of the Design Data and Templates handy, and a project file that has alternate paths laid out.
If you’ve never created a RoboCopy Batch file, here is an example one that I have created:
Robocopy S:\Engineering\Inventor_Support C:\Engineering\Inventor_Support E/
This simple code takes data out of the S: Drive and copies it to the C: Drive, but only if the data has changed. That means if the contents of the network haven’t changed, then the tool does nothing.
Autodesk Vault
With most, if not all data management software, storage of Templates and Design Data can be put into the central location. With Autodesk Vault, those files can then be “Gotten” to a local workspace location. Once there, the Inventor session can then be set up to look at that location via the Master Vault Inventor Project (IPJ). This ensures that users, both on laptops and on towers have access to standardized Design Data as well as Templates at any time.
The major drawback comes from updating these files. With Vault, the first major step to updating Design Data and Templates is of course checking them out. This typically puts these files outside the local workspace location of the Master project, meaning adjacent, but not inside. With that in mind, a secondary “Inventor Support editor Project) should be created in order to check in and out the Templates into their correct location. With this project active, the main template and design data editor would simply check out all the Design data, open the corresponding template files, then save the changes and check all back into the vault.
The second major drawback comes from updating all other users of Vault after these changes have occurred. The rest of the group would need to be notified of a company-wide “get” operation that needs performed on the Templates and Design Data to ensure they are up to date on the local machine. While these types of updates don’t usually happen very often, if care is not taken to enforce the downloading, users may end up using the wrong versions of the templates and design data.
Closing
In closing, I hope that this document sheds some light on different scenarios that can happen through a company’s life using Inventor, whether it’s upgrading versions of software or getting more mobile with laptops; and how to tackle tricky design data and template configurations. As always if you have additional questions or would like Hagerman and Company to assist you in the process of setting these configurations up, don’t hesitate to reach out to your local business development manager.


Comments