A few months ago my colleague Mike Space wrote about powerVault – a native PowerShell extension produced by coolOrange that can dramatically simplify interaction with the Vault API. Today I’d like to build upon that idea by illustrating how using powerVault in conjunction with the Vault Data Standard can provide a complete solution for customizing Vault behavior.
If you’re familiar with the Vault Data Standard, you’re probably already aware that it can be customized. Did you know, though, that you can add completely new commands to the Vault user interface via Data Standard? The key is in understanding the MenuDefinitions.xml file, found by default at:
C:\ProgramData\Autodesk\Vault 20XX\Extensions\DataStandard\Vault\MenuDefinitions.xml
Adding Commands
The file is well commented, so I won’t go into detail regarding all the settings. Rather, I’ll describe the basic idea of how to add a command to the interface. There are three primary sections to this file:
- MenuItem, which defines commands
- CommandSite, which defines where the commands go in the UI
- SuppressMenuItems, which indicates which default Vault commands should be hidden from the user
If you haven’t done so already, copy the MenuDefinitions.xml file into the Vault.custom folder (assuming you’re using a newer version of Vault). This Vault.custom folder (along with the CAD.custom folder) allows you to keep your Data Standard customizations separate from the default install, which should make troubleshooting problems and migrating to new releases easier.
Once you have a copy of MenuDefinitions.xml in the Vault.custom folder, start by adding your command in the MenuItem section. I strongly recommend copying and pasting an existing command as a starting point. You’ll need to modify the element name; this can be anything so long as it’s unique, as it will be used in the CommandSite area to add your command to the interface. In addition, you’ll need to modify the attributes of the element to specify how your command should look when added to the UI. The most important part of the element, though, is the “PSFile” attribute.

The PSFile attribute is the name of the PowerShell script that runs when the command is initiated. This is what ties the Data Standard to your custom logic. While your PowerShell script doesn’t have to use powerVault, I strongly recommend you consider using it if your command is going to interact with Vault data in any way.
Once you have your command defined, add it to the appropriate part of the user interface by modifying one of the elements in the CommandSite area of the file:
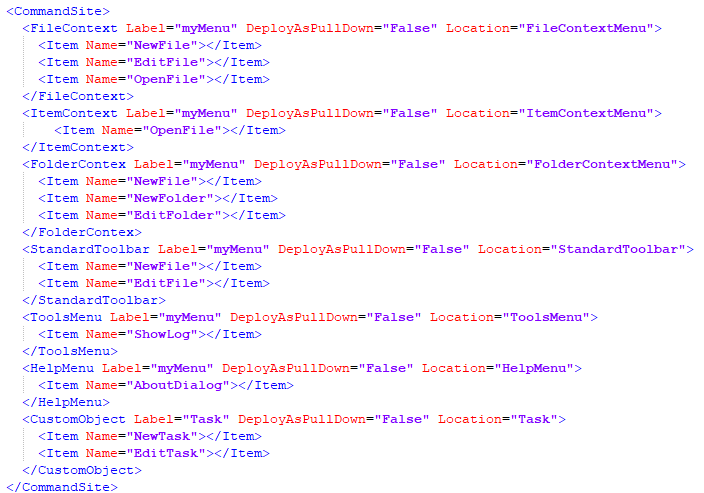
There are locations for the various context (i.e. “right-click”) menus for files, folders, Items, and Custom Objects, along with the default menus and toolbars. You’ll need to add your command via an Item element in the appropriate location(s) depending on where you want your command to be accessed.
Finally, if your command is replacing one of the default commands, you may consider adding the default command to the “SuppressMenuItems” element. This element allows you to specify which default commands should be hidden.
Pro tip: If you don’t want to use the Vault Data standard when creating new folders in Vault, you can modify this same file to remove the “New Standard Folder” Data Standard command from the user interface. To do so, you’d remove the “NewFolder” MenuItem from the FolderContex element and remove the relevant entries from the SuppressMenuItems element.
Tying the Command to the Script
When launching a command this way, the indicated PowerShell script will be executed. In most cases, your command is going to be acting in some way on an object (or multiple objects) selected by the user. You can get to the object(s) by using the $vaultContext.CurrentSelectionSet array. If your command is intended to work on multiple objects, you’ll need to iterate through this array and process them accordingly. If your command is for a single object, though (this is something that can be enforced in the command definition in the MenuDefinitions.xml file), you can access it like so:
$currentSelected = $vaultContext.CurrentSelectionSet[0]
It’s important to note that what is stored in the CUrrentSelectionSet array isn’t references to the objects themselves, though; rather, it includes ISelection objects. To query information about the selected object or to act against it, you’ll need to use the Vault API. This is where powerVault comes in very handy. You can use the Get-VaultFile (or Get-VaultItem) command to get access to the powerVault object with one simple command:
$item = Get-VaultItem -ItemId $currentSelected.Id
Or
$file = Get-VaultFile -ItemId $currentSelected.Id
From there, since it’s a powerVault object, you can directly query properties or use it in any other way you’d use a powerVault object.
A Complete Example
Let’s finish today’s post by looking at a complete solution (note: this specific solution requires Vault Professional). Here’s the situation: you have an Excel spreadsheet that has served as a drawing log for years. It contains information about legacy drawings: Location of the file in a network share, Drawing Number, Revision, Description, Project, etc.
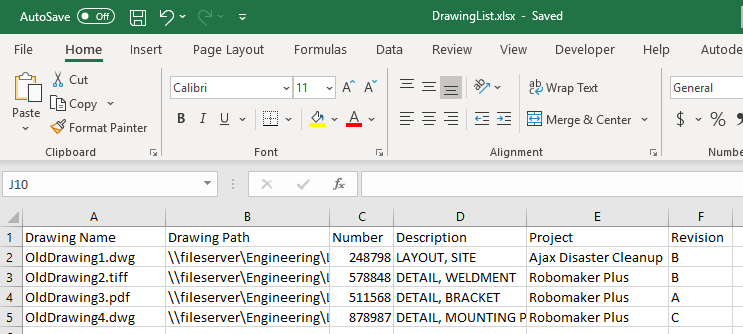
To complicate things further, some of the files are DWG documents, some are scanned TIFF images, and some are scanned PDF documents.
You could add all those files to Vault Professional, but how do you make them searchable? Vault can’t reliably index properties on the files themselves, even if they’re present; remember, all the info is in your handy Excel spreadsheet. Here’s an approach that could leave the legacy documents in place while leveraging Vault’s searching capabilities to provide easy access.
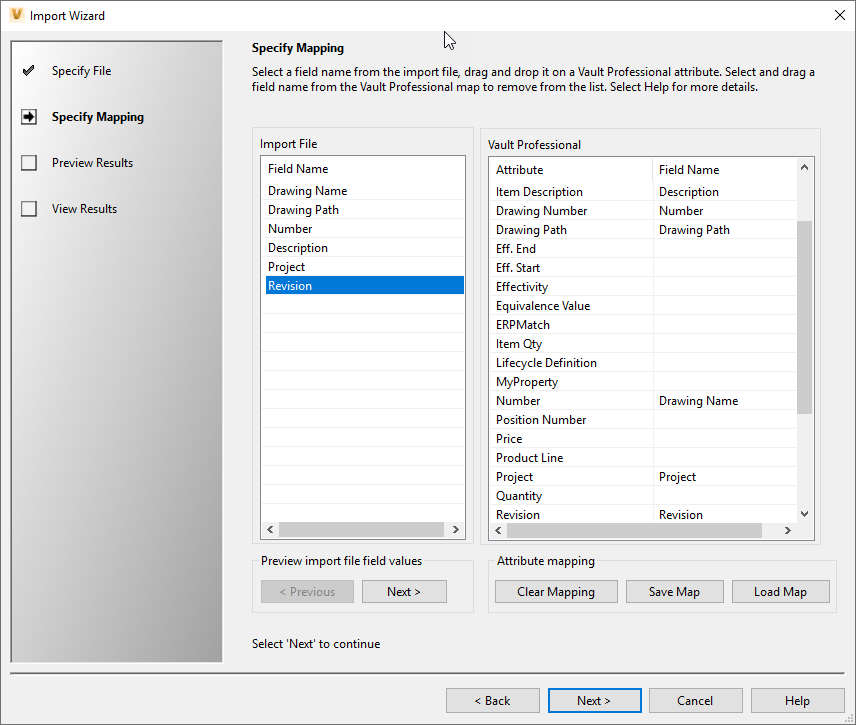
First, start by importing the Excel spreadsheet as Item records. Yes, you read that correctly – we’re going to create Items to represent these files. This is because Items can be created and updated by importing CSV files. Let’s import the spreadsheet (saved as CSV) and map the appropriate properties:
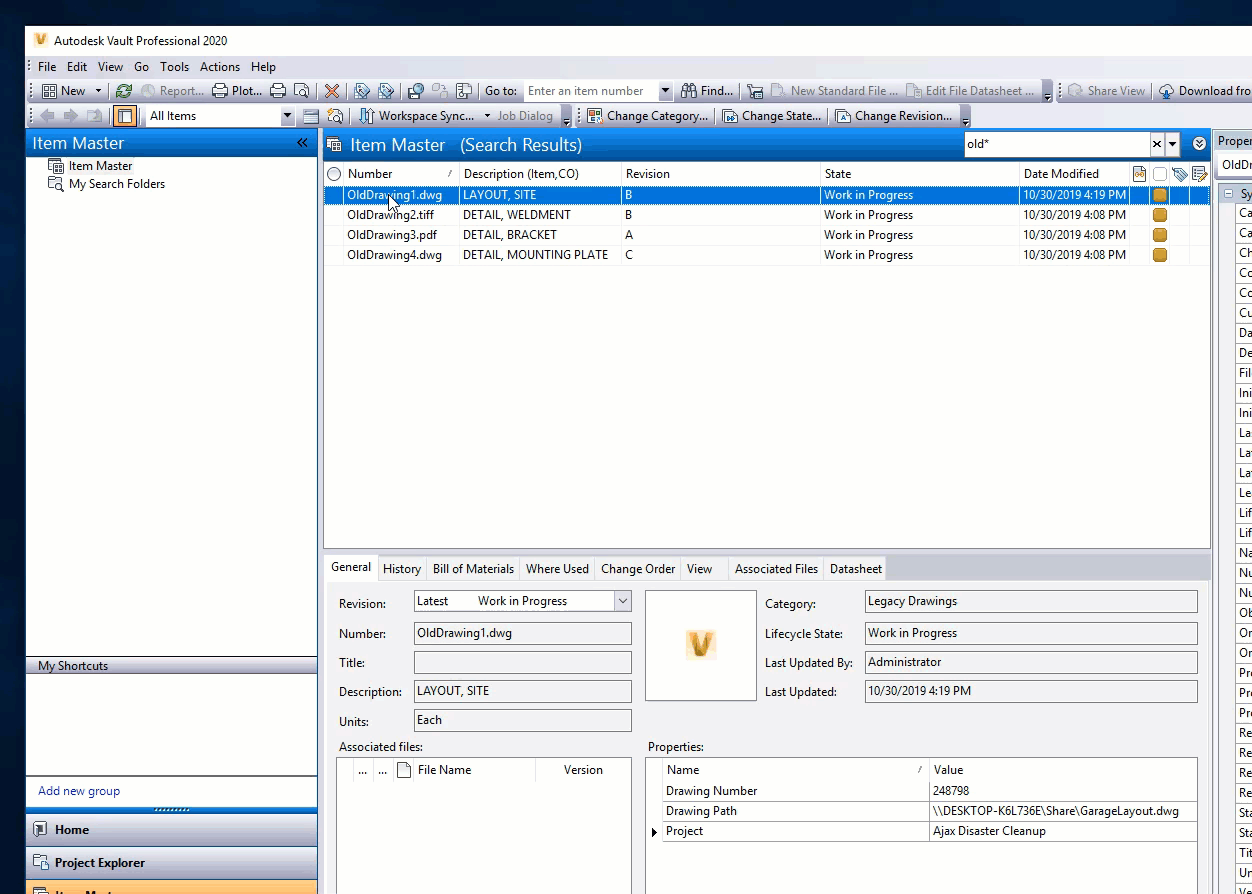
Press Next, then Import, and voila! We now have our drawing index in Vault, where it’s easy to find the drawing(s) we’re after:

Note that one of the imported properties is “Drawing Path” – this is a UNC path to where the file can be found on the network.
Now let’s create our custom command, starting with the PowerShell script. The script is very simple; all we need to do is get at the path stored in the Drawing Path property and use the standard PowerShell Invoke-Item cmdlet. This will tell Windows to open the file specified by the Drawing Path property in whatever application is associated with the file extension. Here’s the script:
$currentSelected = $vaultContext.CurrentSelectionSet[0]
$currentItem = Get-VaultItem -ItemId $currentSelected.Id
Invoke-Item $currentItem."Drawing Path"
No really, that’s it! Just three lines of code, at least if you’re using powerVault. Save the file into the DataStandard\Vault.custom\addInVault\Menus folder. Finally, let’s customize the Data Standard to add the command to our Item context menu. We do this by adding our OpenFile command to the MenuItem section:
<OpenFile Label="Open Legacy File" Description="Open Legacy File" Hint="Open Legacy File"
PSFile="OpenMDTFile.ps1" Image="NewCustomObject.ico" ToolbarPaintStyle="TextAndGlyph"
NavigationTypes="Item" MultiSelectEnabled="False" />
Then add our OpenFile command to the Item Context Menu:
<ItemContext Label="myMenu" DeployAsPullDown="False" Location="ItemContextMenu">
<Item Name="OpenFile"></Item>
</ItemContext>
Note that you do need to restart the Vault client after modifying MenuDefinitions.xml, but you do not need to restart Vault after modifying your PowerShell script.
We now have everything in place to use the Vault Item Master as our new Drawing Index. Just right-click on the appropriate Item Record and choose “Open Legacy File”:
And just like that you now have a smarter, more easily searchable Drawing Index that can be used straight from your Vault.


Comments