
For new Revit® users and even seasoned experts that have been using the software for a while, I like to point out excellent and underused features of the software that you forgot about or might have missed. One of the hardest things to do while working with Revit Curtain Walls can be selecting the exact mullions you need to modify. When I first started working with the software I would resort to doing a window selection, then filtering out objects I did not mean to select. With Revit Curtain Walls, it was almost a guarantee that you would at least select the curtain grid and some other miscellaneous items that no doubt needed to be filtered from your selection. If you are currently using this method, here is the good news: There is actually a hidden tool specifically designed to help while working with mullions.
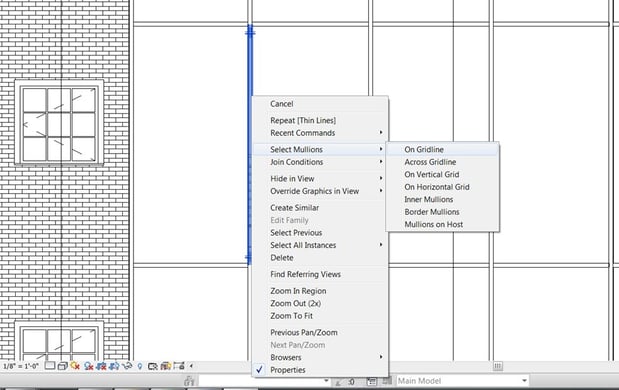
In the example image above, you can see that all I had to do was right click on my intended mullion and the resulting right click menu has a “Select Mullions” Flyout menu. This Flyout Menu has 6 pretty self-explanatory selection options. But here is a handy guide:
- On Gridline: All mullions in-line with selected mullion on the same grid line.
- Across Gridline: All inner mullions parallel to the selected mullion
- On vertical Grid: All inner mullions on any vertical grid regardless of selected mullion
- On Horizontal Grid: All inner mullions on any horizontal grid regardless of selected mullion
- Inner Mullions: All inner mullions will be selected
- Border Mullions: All border mullions will be selected
- Mullions on Host: All mullions on the selected wall will be selected
This feature is a huge time saver. In addition to filtering out unwanted geometry, you no longer will have to painstakingly click on individual mullions to get the proper selection. One other scenario where this is very useful is when you are working in plan and notice you need to switch out a rectangular mullion for a corner mullion. If you simply click on the one shown in plan and change it to a different family, you will most likely get the unintended consequence as shown in the following sequence:

If you simply click on this mullion and change it to a corner mullion, you may experience this issue in the next image:
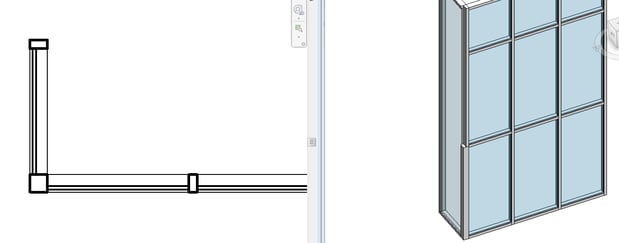
You can see that this looks correct in plan, but in elevation or 3D you can see that the upper mullions not shown in the plan were not changed. You can avoid this by right clicking on your mullion in plan, finding the Select Mullions flyout and choose On Gridline and you can change them all at once.
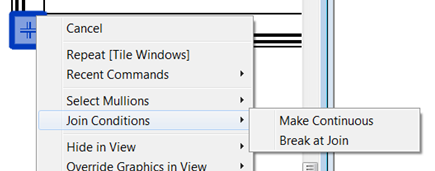
One other mullion specific feature you might have also noticed is called “Join Mullions.” It is located right underneath the “Select Mullions” flyout menu. This feature will allow you to change the join condition to continuous or break at join. If you have multiple mullions selected, you can use this to change them all at once.
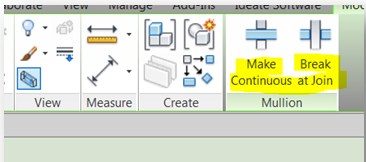
It is also worth noting that if you have only mullions selected, you will also have mullion join buttons available on your contextual ribbon as shown below:
Working with mullions and getting them to behave exactly how you want can be aggravating, so I hope these simple time-saving tips will help in your Curtain Wall workflow.


Comments